728x90

Next.js 컴포넌트화


현재 Front 쪽 코드는 아래와 같습니다.

import {FormEventHandler} from "react";
import {redirect} from "next/navigation";


export default async function Home() {


    async function getData(){
        "use server";
        const url = new URL("http://localhost:4882")
        Object.keys(searchParams).map((param:string)=>{
            url.searchParams.append(param,searchParams[param] as string)
        });
        let resp = await fetch(url);
        let result = await resp.json()
        return result.data
    }

    const items = await getData();
    return (
        <main className="flex min-h-screen flex-col items-center justify-between p-24">
            <form className={"w-full overflow-hidden"}>
                <div className="pt-2 relative text-gray-600 w-px245 w-max">
                    <input
                        className="border-2 border-gray-300 bg-white h-10 px-5 pr-16 rounded-lg text-sm focus:outline-none relative"
                        type="search" name="srchTxt" placeholder="Search"/>
                    <button type="submit" className="absolute right-0 top-0 mt-5 mr-4">
                        <svg className="text-gray-600 h-4 w-4 fill-current" xmlns="http://www.w3.org/2000/svg"
                             xmlnsXlink="http://www.w3.org/1999/xlink" version="1.1" id="Capa_1" x="0px" y="0px"
                             viewBox="0 0 56.966 56.966" style={{background: "new 0 0 56.966 56.966"}}
                             xmlSpace="preserve"
                             width="512px" height="512px">
                            <path
                                d="M55.146,51.887L41.588,37.786c3.486-4.144,5.396-9.358,5.396-14.786c0-12.682-10.318-23-23-23s-23,10.318-23,23  s10.318,23,23,23c4.761,0,9.298-1.436,13.177-4.162l13.661,14.208c0.571,0.593,1.339,0.92,2.162,0.92  c0.779,0,1.518-0.297,2.079-0.837C56.255,54.982,56.293,53.08,55.146,51.887z M23.984,6c9.374,0,17,7.626,17,17s-7.626,17-17,17  s-17-7.626-17-17S14.61,6,23.984,6z"/>
                        </svg>
                    </button>
                </div>

                <div className="flex flex-col">
                    <div className="overflow-x-auto sm:-mx-6 lg:-mx-8">
                        <div className="inline-block min-w-full py-2 sm:px-6 lg:px-8">
                            <div className="overflow-hidden">
                                <table
                                    className="min-w-full text-left text-sm font-light text-surface dark:text-white">
                                    <thead
                                        className="border-b border-neutral-200 font-medium dark:border-white/10">
                                    <tr>
                                        <th scope="col" className="px-6 py-4">#</th>
                                        <th scope="col" className="px-6 py-4">First</th>
                                        <th scope="col" className="px-6 py-4">Last</th>
                                        <th scope="col" className="px-6 py-4">Handle</th>
                                    </tr>
                                    </thead>
                                    <tbody>
                                    {items?.map((item:{[key:string]:string})=> {
                                        return <tr className="border-b border-neutral-200 dark:border-white/10" key={Math.random()}>
                                            <td className="whitespace-nowrap px-6 py-4 font-medium">{item["번호"]}</td>
                                            <td className="whitespace-nowrap px-6 py-4">{item[Object.keys(item)[1]]}</td>
                                            <td className="whitespace-nowrap px-6 py-4">{item[Object.keys(item)[2]]}</td>
                                            <td className="whitespace-nowrap px-6 py-4">{item[Object.keys(item)[3]]}</td>
                                        </tr>
                                    })}
                                    </tbody>
                                </table>
                            </div>
                        </div>
                    </div>
                </div>

                <nav aria-label="Page navigation example">
                    <ul className="list-style-none flex">
                        <li>
                            <a
                                className="relative block rounded bg-transparent px-3 py-1.5 text-sm text-surface transition duration-300 hover:bg-neutral-100 focus:bg-neutral-100 focus:text-primary-700 focus:outline-none focus:ring-0 active:bg-neutral-100 active:text-primary-700 dark:text-white dark:hover:bg-neutral-700 dark:focus:bg-neutral-700 dark:focus:text-primary-500 dark:active:bg-neutral-700 dark:active:text-primary-500"
                                href="#"
                            >Previous</a
                            >
                        </li>
                        <li>
                            <a
                                className="relative block rounded bg-transparent px-3 py-1.5 text-sm text-surface transition duration-300 hover:bg-neutral-100 focus:bg-neutral-100 focus:text-primary-700 focus:outline-none active:bg-neutral-100 active:text-primary-700 dark:text-white dark:hover:bg-neutral-700 dark:focus:bg-neutral-700 dark:focus:text-primary-500 dark:active:bg-neutral-700 dark:active:text-primary-500"
                                href="#"
                            >1</a
                            >
                        </li>
                        <li aria-current="page">
                            <a
                                className="relative block rounded bg-transparent px-3 py-1.5 text-sm text-surface transition duration-300 hover:bg-neutral-100 focus:bg-neutral-100 focus:text-primary-700 focus:outline-none active:bg-neutral-100 active:text-primary-700 dark:text-white dark:hover:bg-neutral-700 dark:focus:bg-neutral-700 dark:focus:text-primary-500 dark:active:bg-neutral-700 dark:active:text-primary-500"
                                href="#"
                            >2</a
                            >
                        </li>
                        <li>
                            <a
                                className="relative block rounded bg-transparent px-3 py-1.5 text-sm text-surface transition duration-300 hover:bg-neutral-100 focus:bg-neutral-100 focus:text-primary-700 focus:outline-none active:bg-neutral-100 active:text-primary-700 dark:text-white dark:hover:bg-neutral-700 dark:focus:bg-neutral-700 dark:focus:text-primary-500 dark:active:bg-neutral-700 dark:active:text-primary-500"
                                href="#"
                            >3</a
                            >
                        </li>
                        <li>
                            <a
                                className="relative block rounded bg-transparent px-3 py-1.5 text-sm text-surface transition duration-300 hover:bg-neutral-100 focus:bg-neutral-100 focus:text-primary-700 focus:outline-none active:bg-neutral-100 active:text-primary-700 dark:text-white dark:hover:bg-neutral-700 dark:focus:bg-neutral-700 dark:focus:text-primary-500 dark:active:bg-neutral-700 dark:active:text-primary-500"
                                href="#"
                            >Next</a
                            >
                        </li>
                    </ul>
                </nav>
            </form>
        </main>
    );
}


response 받은 데이터를 기반으로 컴포넌트들을 그려보면 좋을 거 같습니다.


src 디렉토리에 libs 디렉토리를 만들고 그 하위에 components 를 만들어 줍니다.


처음으로 만들 컴포넌트는 3개입니다.


1. 검색 바

2. 데이터 리스트

3. paging navigation


먼저 각 부분 디렉토리를 만들어 주고, 그안에 index.tsx 그리고 컴포넌의 tsx 파일을 만들고 코드를 옮겨줍니다.


1. 검색 바 - SearchBar


export default function SearchBar({searchText}:{searchText:string}) {

    return <div className="pt-2 relative text-gray-600 w-px245 w-max">
        <input
            className="border-2 border-gray-300 bg-white h-10 px-5 pr-16 rounded-lg text-sm focus:outline-none relative"
            type="search" name="srchTxt" placeholder="Search" defaultValue={searchText || ""}/>
        <button type="submit" className="absolute right-0 top-0 mt-5 mr-4">
            <svg className="text-gray-600 h-4 w-4 fill-current" xmlns="http://www.w3.org/2000/svg"
                 xmlnsXlink="http://www.w3.org/1999/xlink" version="1.1" id="Capa_1" x="0px" y="0px"
                 viewBox="0 0 56.966 56.966" style={{background: "new 0 0 56.966 56.966"}}
                 xmlSpace="preserve"
                 width="512px" height="512px">
                <path
                    d="M55.146,51.887L41.588,37.786c3.486-4.144,5.396-9.358,5.396-14.786c0-12.682-10.318-23-23-23s-23,10.318-23,23  s10.318,23,23,23c4.761,0,9.298-1.436,13.177-4.162l13.661,14.208c0.571,0.593,1.339,0.92,2.162,0.92  c0.779,0,1.518-0.297,2.079-0.837C56.255,54.982,56.293,53.08,55.146,51.887z M23.984,6c9.374,0,17,7.626,17,17s-7.626,17-17,17  s-17-7.626-17-17S14.61,6,23.984,6z"/>
            </svg>
        </button>
    </div>
}


검색 바의 경우에는 기본 value 값이 필요합니다. 검색 입력 된 텍스트를 기본 value로 넣어 주는데, Next.js의 경우에는 defaultValue에 넣어 줍니다.


2. DataList


type item = { [key: string]: string }

type PropsType = {
    items?: item[]
}

export default function DataList({items}:PropsType) {
    return <div className={"grow"}>
        <div className="overflow-x-auto sm:-mx-6 lg:-mx-8">
            <div className="inline-block min-w-full py-2 sm:px-6 lg:px-8 grow-1">
                <div className="overflow-hidden">
                    <table
                        className="min-w-full text-left text-sm font-light text-surface dark:text-white">
                        <thead
                            className="border-b border-neutral-200 font-medium dark:border-white/10">
                        <tr>
                            <th scope="col" className="px-3 sm:px-6 py-3 sm:py-4">#</th>
                            <th scope="col" className="px-3 sm:px-6 py-3 sm:py-4">First</th>
                            <th scope="col" className="px-3 sm:px-6 py-3 sm:py-4">Last</th>
                            <th scope="col" className="px-3 sm:px-6 py-3 sm:py-4">Handle</th>
                        </tr>
                        </thead>
                        <tbody>
                        {items?.map((item: { [key: string]: string }) => {
                            return <tr className="border-b border-neutral-200 dark:border-white/10"
                                       key={Math.random()}>
                                <td className="whitespace-nowrap px-3 sm:px-6 py-3 sm:py-4 font-medium">{item["번호"]}</td>
                                <td className="whitespace-nowrap px-3 sm:px-6 py-3 sm:py-4">{item[Object.keys(item)[1]]}</td>
                                <td className="whitespace-nowrap px-3 sm:px-6 py-3 sm:py-4">{item[Object.keys(item)[2]]}</td>
                                <td className="whitespace-nowrap px-3 sm:px-6 py-3 sm:py-4">{item[Object.keys(item)[3]]}</td>
                            </tr>
                        })}
                        </tbody>
                    </table>
                </div>
            </div>
        </div>
    </div>
}


3. PagingNav


import {PagingType} from "./utils.d"

export class Paging {

    pagingSize: number = 10;
    curPagingSize: number = 10;
    curFirstPage: number = 1;
    curLastPage: number = 0;
    curPrevPage: number = 0;
    curNextPage: number = 0;
    lastPage: number = 0;
    curPrevPageOk: boolean = false;
    curNextPageOk: boolean = false;

    constructor(paging: PagingType) {
        this.pagingSize = paging?.pagingSize || this.pagingSize;
        this.curFirstPage = this.getCurFirstPage(paging.page);
        this.curLastPage = this.getCurLastPage(paging.page, paging.totalPage);
        this.curPagingSize = this.curLastPage - this.curFirstPage + 1;
        this.curPrevPage = paging.page - 1;
        this.curNextPage = paging.page + 1;
        this.curPrevPageOk = 0 <= this.curPrevPage;
        this.curNextPageOk =this.curNextPage < paging.totalPage;
        this.lastPage = paging.totalPage;
    }

    getCurLastPage(page: number, totalPage: number): number {
        let curLp: number = this.getCurFirstPage(page) + (this.pagingSize - 1);
        return curLp >= totalPage ? totalPage : curLp;
    }

    getCurFirstPage(page: number): number {
        return Math.floor((page - 1) / this.pagingSize) * this.pagingSize + 1;
    }
}
import {PagingType} from "@/libs/utils/utils.d";
import {Paging} from "@/libs/utils/utils";

type PropsType = {
    paging:PagingType
}

export default function PagingNav({paging}:PropsType) {

    const page = new Paging(paging);
    return <nav aria-label="Page navigation example">
        <ul className="list-style-none flex">
            {page.curPrevPageOk && <>
                <li>
                    <button
                        className="relative block rounded bg-transparent px-3 py-1.5 text-sm text-surface transition duration-300 hover:bg-neutral-100 focus:bg-neutral-100 focus:text-primary-700 focus:outline-none focus:ring-0 active:bg-neutral-100 active:text-primary-700 dark:text-white dark:hover:bg-neutral-700 dark:focus:bg-neutral-700 dark:focus:text-primary-500 dark:active:bg-neutral-700 dark:active:text-primary-500"
                        type={"submit"} value={1} name={"page"}
                    >First
                    </button
                    >
                </li>
                <li>
                    <button
                        className="relative block rounded bg-transparent px-3 py-1.5 text-sm text-surface transition duration-300 hover:bg-neutral-100 focus:bg-neutral-100 focus:text-primary-700 focus:outline-none focus:ring-0 active:bg-neutral-100 active:text-primary-700 dark:text-white dark:hover:bg-neutral-700 dark:focus:bg-neutral-700 dark:focus:text-primary-500 dark:active:bg-neutral-700 dark:active:text-primary-500"
                        type={"submit"} value={page.curPrevPage} name={"page"}
                    >Previous
                    </button
                    >
                </li>

            </>}
            {Array(page.curPagingSize).fill(0).map((_, i) => {
                return <li>
                    <button
                        className={`relative block rounded px-3 py-1.5 text-sm text-surface transition duration-300 hover:bg-neutral-100 hover:text-black focus:bg-neutral-100 focus:text-primary-700 focus:outline-none active:bg-neutral-100 active:text-primary-700 dark:text-white dark:hover:bg-neutral-700 dark:focus:bg-neutral-700 dark:focus:text-primary-500 dark:active:bg-neutral-700 dark:active:text-primary-500 ${paging.page === page.curFirstPage + i && "bg-black text-white"}`}
                        type={"submit"} value={page.curFirstPage + i} name={"page"}
                    >{page.curFirstPage + i}</button>
                </li>
            })}
            {page.curNextPageOk && <>
                <li>
                    <button
                        className="relative block rounded bg-transparent px-3 py-1.5 text-sm text-surface transition duration-300 hover:bg-neutral-100 focus:bg-neutral-100 focus:text-primary-700 focus:outline-none active:bg-neutral-100 active:text-primary-700 dark:text-white dark:hover:bg-neutral-700 dark:focus:bg-neutral-700 dark:focus:text-primary-500 dark:active:bg-neutral-700 dark:active:text-primary-500"
                        type={"submit"} value={page.curNextPage} name={"page"}
                    >Next
                    </button>
                </li>
                <li>
                    <button
                        className="relative block rounded bg-transparent px-3 py-1.5 text-sm text-surface transition duration-300 hover:bg-neutral-100 focus:bg-neutral-100 focus:text-primary-700 focus:outline-none active:bg-neutral-100 active:text-primary-700 dark:text-white dark:hover:bg-neutral-700 dark:focus:bg-neutral-700 dark:focus:text-primary-500 dark:active:bg-neutral-700 dark:active:text-primary-500"
                        type={"submit"} value={page.lastPage} name={"page"}
                    >Last
                    </button>
                </li>
            </>}
        </ul>
    </nav>
}


4.Page


import {FormEventHandler} from "react";
import {redirect} from "next/navigation";
import {Paging} from "../libs/utils/utils";
import SearchBar from "@/libs/components/SearchBar/SearchBar";
import DataList from "@/libs/components/DataList/DataList";
import PagingNav from "@/libs/components/PagingNav/PagingNav";

type searchParamsType = { [key: string]: string | null }
export default async function Home({searchParams}: { searchParams: searchParamsType }) {

    async function getData(searchParam?: searchParamsType) {
        "use server";
        const url = new URL("http://localhost:4882")
        Object.keys(searchParams).map((param: string) => {
            url.searchParams.append(param, searchParams[param] as string)
        });
        let resp = await fetch(url, {cache:"no-store"});
        // let resp = await fetch(url, {next:{revalidate:60*60}});
        let result = await resp.json()
        return result
    }

    async function go(formData: FormData = new FormData()) {
        "use server";
        let curPage:string | null = searchParams["page"]
        let curSrchTxt:string | null = searchParams["srchTxt"]
        let page:FormDataEntryValue | null = formData.get('page')
        const url = new URL("http://localhost:3000")
        url.searchParams.append("srchTxt", formData.get('srchTxt') as string);
        if(curPage && !page){
            url.searchParams.append("page", curPage as string);
        }else if(page){
            url.searchParams.append("page", page as string);
        }

        if(curSrchTxt===formData.get('srchTxt')as string && curPage===page){
            return false;
        }

        redirect(url.toString());

    }

    const result = await getData(searchParams);
    const {items, paging} = result;

    return (
        <main className="flex min-h-screen flex-col items-center justify-between p-6 sm:p-24 h-screen">
            <form action={go} className={"w-full flex flex-col grow"}>

                <SearchBar searchText={searchParams["srchTxt"] as string}/>

                <DataList items={items}/>
                <PagingNav paging={paging} />
            </form>
        </main>
    );
}


728x90
728x90

FastAPI ResponseBody Model 만들기


https://fastapi.tiangolo.com/ko/tutorial/response-model/


응답 모델 - FastAPI

FastAPI framework, high performance, easy to learn, fast to code, ready for production

fastapi.tiangolo.com


1. ResponseModel


from typing import Optional, List

from pydantic import Field, BaseModel


class ResponseModel(BaseModel):
    msg:str = Field("", description="응답메세지")
    isOk:bool =  Field(True, description="응답 성공 여부")
    items:Optional[List[dict] | dict] = Field(None, description="응답 데이터")


2. ReponseModelPaging


class Paging(BaseModel):
    totalSize: int = Field(0, description="전체 갯수")
    totalPage: int = Field(0, description="전체 페이지 수")
    page: int = Field(1, description="현재 페이지")
    size: int = Field(10, description="출력 갯수")


class ResponseModelPaging(ResponseModel):
    paging: Paging = Field(Paging(), description="페이지 정보")


3. Genric Type

from typing import TypeVar, Generic
T = TypeVar("T")

class ResponseModel(BaseModel,Generic[T]):


4. Main

"""
main.py
@제목: 메인 실행 파일
@설명: 메인 실행 파일

    작성일자        작성자
-----------------------
    2024.03.14    hiio420

"""
import math
import os.path

from fastapi import FastAPI
from pydantic import BaseModel
from starlette.middleware.cors import CORSMiddleware

from libs import ExcelUtils
from models import ResponseModel, ResponseModelPaging, Paging

# 엑셀 파일 불러오기

CUR_DIR = os.path.abspath(os.path.dirname(__file__))
UPLOAD_DIR = os.path.join(CUR_DIR, 'upload')
file_path = os.path.join(UPLOAD_DIR, '(붙임)공공데이터 공통표준용어(2022.7월).xlsx')

excel_utils = ExcelUtils()
df_dict = excel_utils.read_excel(file_path)

app = FastAPI()
app.add_middleware(
    CORSMiddleware,
    allow_origins=["*"],
    allow_credentials=True,
    allow_methods=["*"],
    allow_headers=["*"],
)


class Item(BaseModel):
    data_id: int = 0
    page: int = 1
    limit: int = 10


@app.get("/",response_model=ResponseModelPaging[dict])
def read_root(dataId: int = 0, page: int = 1, limit: int = 10, srchTxt: str = ""):
    if page < 1:
        page = 0
    if limit < 10:
        limit = 10
    df = df_dict[dataId]
    df = df[df.apply(lambda row: row.astype(str).str.contains(srchTxt, case=False).any(), axis=1)]

    first_idx = (page - 1) * limit
    last_idx = first_idx + limit - 1
    total_size = df.shape[0]
    last_page = math.ceil(total_size / limit)

    df_sliced = df[first_idx:last_idx + 1].copy()

    df_sliced["번호"] = [i for i in
                       range(total_size - (page - 1) * limit, total_size - (page - 1) * limit - df_sliced.shape[0], -1)]
    data = []
    if df_sliced.shape[0] != 0:
        data = df_sliced.to_dict("records")
    paging = Paging(page=page, size=limit, totalPage=last_page,totalSize=total_size)
    resp = ResponseModelPaging(items=data,paging=paging)
    print(resp)
    return resp
728x90
728x90

화면 만들어보기 #3 fetch 로 데이터 불러와서 뿌려주기


이제 이전에 만들었던 FastAPI 서버와 통신해 데이터를 가져와보자.


NextJs 는 13버전 에서 부터 SSG, SSR, ISR의 Data Fetching 을 fetch api 를 통해 사용 할 수 있게 되었다.


https://nextjs.org/docs/app/building-your-application/data-fetching/fetching-caching-and-revalidating


Data Fetching: Fetching, Caching, and Revalidating | Next.js

Learn how to fetch, cache, and revalidate data in your Next.js application.

nextjs.org


그렇다고 합니다.


우선은 깊게 알아보지는 않고 fetch 함수를 이용해 데이터를 불러옵니다.


export default async function Home() {

    const response =await fetch("http://localhost:4882");
    const data =await response.json();
    const items = data.data;
    console.info(items.length)
    
    ...


데이터가 잘 들어오는 것을 볼 수 있습니다.


이제 이 데이터를 가지고 이전에 그렸던 Data Table 부분을 처리해봅니다.


{items?.map((item:{[key:string]:string})=> {
    return <tr className="border-b border-neutral-200 dark:border-white/10" key={Math.random()}>
        <td className="whitespace-nowrap px-6 py-4 font-medium">{item["번호"]}</td>
        <td className="whitespace-nowrap px-6 py-4">{item[Object.keys(item)[1]]}</td>
        <td className="whitespace-nowrap px-6 py-4">{item[Object.keys(item)[2]]}</td>
        <td className="whitespace-nowrap px-6 py-4">{item[Object.keys(item)[3]]}</td>
    </tr>
})}


데이터가 잘 나오기는 하지만 아직 어영부영 어수선 해 보이네요 무엇을 중점적으로 볼지도 모르고 아직은 많이 부족합니다.


우선은 스타일 조정 부터 해줍니다.


form의 width 부터 main 태그에 맞춰 추기 위해 className 에 w-full을 주었습니다.


<form className={"w-full"}>
...


돋보기 아이콘이 search box 안에 있어야하는데 searchbox를 감사는 div의 너비가 form에 맞춰지면서 범위를 벗어나 버렸습니다.


div 너비를 width:max-content 값을 줘서 맞춰줍니다.

<div className="pt-2 relative mx-auto text-gray-600 w-px245 w-max">
...


가운데 있는 것보다는 왼쪽으로 정렬된 것이 보기 좋을 거 같아서 mx-auto는 지워버립니다.


<div className="pt-2 relative text-gray-600 w-px245 w-max">
...


얼추 만들어져 가는 모습이네요 


728x90
728x90

화면 만들어보기 #2 기본 화면 그려보기


이제 처음으로 화면을 그려 보자!!!!!

화면을 직접 구현해 보는건 언제나 많은 고민이 따르는 듯


매우 심플한 레이아웃을 가지고 있다.


이제 각 부분에 한땀한땀 디자인을 넣는것 보다 구글링해서 찾은 이쁜 Tailwind Style 에 컴포넌트를 넣어보자


Search Bar 의 경우

https://tailwindcomponents.com/component/search-bar


Search bar | Forms

'Gray outline, navigation, minimal, search, tailwind css'

tailwindcomponents.com

를 참고 하였다.


<!-- component -->
<!-- This is an example component -->
     <div class="pt-2 relative mx-auto text-gray-600">
        <input class="border-2 border-gray-300 bg-white h-10 px-5 pr-16 rounded-lg text-sm focus:outline-none"
          type="search" name="search" placeholder="Search">
        <button type="submit" class="absolute right-0 top-0 mt-5 mr-4">
          <svg class="text-gray-600 h-4 w-4 fill-current" xmlns="http://www.w3.org/2000/svg"
            xmlns:xlink="http://www.w3.org/1999/xlink" version="1.1" id="Capa_1" x="0px" y="0px"
            viewBox="0 0 56.966 56.966" style="enable-background:new 0 0 56.966 56.966;" xml:space="preserve"
            width="512px" height="512px">
            <path
              d="M55.146,51.887L41.588,37.786c3.486-4.144,5.396-9.358,5.396-14.786c0-12.682-10.318-23-23-23s-23,10.318-23,23  s10.318,23,23,23c4.761,0,9.298-1.436,13.177-4.162l13.661,14.208c0.571,0.593,1.339,0.92,2.162,0.92  c0.779,0,1.518-0.297,2.079-0.837C56.255,54.982,56.293,53.08,55.146,51.887z M23.984,6c9.374,0,17,7.626,17,17s-7.626,17-17,17  s-17-7.626-17-17S14.61,6,23.984,6z" />
          </svg>
        </button>
      </div>


이 코드를 바로 쓰기에는 문법에 다 걸리기 때문에 몇몇 부분을 바꿔주어야 한다.


class -> className


xmlns:xlink -> xmlnsXlink


xml:space -> xmlSpace


style="..." => style={{...}}


수정을 해주고 npm run dev를 실행하면 검색 Input이 나타 난다.


Data List View 는 

https://tw-elements.com/docs/standard/data/tables/


Tailwind CSS Tables - Free Examples & Tutorial

Use responsive table component, with helper examples for table column width, bordered and striped tables, pagination, fixed header, overflow, spacing & more.

tw-elements.com

사이트를 참고 하였고, 가장 심플한 부분을 사용했다.


Pagination 도 위 사이트에서 참고 하였다.


https://tw-elements.com/docs/standard/navigation/pagination/


Tailwind CSS Pagination - Free Examples & Tutorial

Use responsive pagination component with helper examples for buttons, arrows, previous & next pages. Use pagination in tables or with long content.

tw-elements.com


위 3가지 컴포넌트를 우선 form 태그로 감싸주자.


export default function Home() {

    return (
        <main className="flex min-h-screen flex-col items-center justify-between p-24">
            <form>
                <div className="pt-2 relative mx-auto text-gray-600">
                    <input
                        className="border-2 border-gray-300 bg-white h-10 px-5 pr-16 rounded-lg text-sm focus:outline-none"
                        type="search" name="search" placeholder="Search"/>
                    <button type="submit" className="absolute right-0 top-0 mt-5 mr-4">
                        <svg className="text-gray-600 h-4 w-4 fill-current" xmlns="http://www.w3.org/2000/svg"
                             xmlnsXlink="http://www.w3.org/1999/xlink" version="1.1" id="Capa_1" x="0px" y="0px"
                             viewBox="0 0 56.966 56.966" style={{background: "new 0 0 56.966 56.966"}}
                             xmlSpace="preserve"
                             width="512px" height="512px">
                            <path
                                d="M55.146,51.887L41.588,37.786c3.486-4.144,5.396-9.358,5.396-14.786c0-12.682-10.318-23-23-23s-23,10.318-23,23  s10.318,23,23,23c4.761,0,9.298-1.436,13.177-4.162l13.661,14.208c0.571,0.593,1.339,0.92,2.162,0.92  c0.779,0,1.518-0.297,2.079-0.837C56.255,54.982,56.293,53.08,55.146,51.887z M23.984,6c9.374,0,17,7.626,17,17s-7.626,17-17,17  s-17-7.626-17-17S14.61,6,23.984,6z"/>
                        </svg>
                    </button>
                </div>

                <div className="flex flex-col">
                    <div className="overflow-x-auto sm:-mx-6 lg:-mx-8">
                        <div className="inline-block min-w-full py-2 sm:px-6 lg:px-8">
                            <div className="overflow-hidden">
                                <table
                                    className="min-w-full text-left text-sm font-light text-surface dark:text-white">
                                    <thead
                                        className="border-b border-neutral-200 font-medium dark:border-white/10">
                                    <tr>
                                        <th scope="col" className="px-6 py-4">#</th>
                                        <th scope="col" className="px-6 py-4">First</th>
                                        <th scope="col" className="px-6 py-4">Last</th>
                                        <th scope="col" className="px-6 py-4">Handle</th>
                                    </tr>
                                    </thead>
                                    <tbody>
                                    <tr className="border-b border-neutral-200 dark:border-white/10">
                                        <td className="whitespace-nowrap px-6 py-4 font-medium">1</td>
                                        <td className="whitespace-nowrap px-6 py-4">Mark</td>
                                        <td className="whitespace-nowrap px-6 py-4">Otto</td>
                                        <td className="whitespace-nowrap px-6 py-4">@mdo</td>
                                    </tr>
                                    <tr className="border-b border-neutral-200 dark:border-white/10">
                                        <td className="whitespace-nowrap px-6 py-4 font-medium">2</td>
                                        <td className="whitespace-nowrap px-6 py-4">Jacob</td>
                                        <td className="whitespace-nowrap px-6 py-4">Thornton</td>
                                        <td className="whitespace-nowrap px-6 py-4">@fat</td>
                                    </tr>
                                    <tr className="border-b border-neutral-200 dark:border-white/10">
                                        <td className="whitespace-nowrap px-6 py-4 font-medium">3</td>
                                        <td className="whitespace-nowrap px-6 py-4">Larry</td>
                                        <td className="whitespace-nowrap px-6 py-4">Wild</td>
                                        <td className="whitespace-nowrap px-6 py-4">@twitter</td>
                                    </tr>
                                    </tbody>
                                </table>
                            </div>
                        </div>
                    </div>
                </div>

                <nav aria-label="Page navigation example">
                    <ul className="list-style-none flex">
                        <li>
                            <a
                                className="relative block rounded bg-transparent px-3 py-1.5 text-sm text-surface transition duration-300 hover:bg-neutral-100 focus:bg-neutral-100 focus:text-primary-700 focus:outline-none focus:ring-0 active:bg-neutral-100 active:text-primary-700 dark:text-white dark:hover:bg-neutral-700 dark:focus:bg-neutral-700 dark:focus:text-primary-500 dark:active:bg-neutral-700 dark:active:text-primary-500"
                                href="#"
                            >Previous</a
                            >
                        </li>
                        <li>
                            <a
                                className="relative block rounded bg-transparent px-3 py-1.5 text-sm text-surface transition duration-300 hover:bg-neutral-100 focus:bg-neutral-100 focus:text-primary-700 focus:outline-none active:bg-neutral-100 active:text-primary-700 dark:text-white dark:hover:bg-neutral-700 dark:focus:bg-neutral-700 dark:focus:text-primary-500 dark:active:bg-neutral-700 dark:active:text-primary-500"
                                href="#"
                            >1</a
                            >
                        </li>
                        <li aria-current="page">
                            <a
                                className="relative block rounded bg-transparent px-3 py-1.5 text-sm text-surface transition duration-300 hover:bg-neutral-100 focus:bg-neutral-100 focus:text-primary-700 focus:outline-none active:bg-neutral-100 active:text-primary-700 dark:text-white dark:hover:bg-neutral-700 dark:focus:bg-neutral-700 dark:focus:text-primary-500 dark:active:bg-neutral-700 dark:active:text-primary-500"
                                href="#"
                            >2</a
                            >
                        </li>
                        <li>
                            <a
                                className="relative block rounded bg-transparent px-3 py-1.5 text-sm text-surface transition duration-300 hover:bg-neutral-100 focus:bg-neutral-100 focus:text-primary-700 focus:outline-none active:bg-neutral-100 active:text-primary-700 dark:text-white dark:hover:bg-neutral-700 dark:focus:bg-neutral-700 dark:focus:text-primary-500 dark:active:bg-neutral-700 dark:active:text-primary-500"
                                href="#"
                            >3</a
                            >
                        </li>
                        <li>
                            <a
                                className="relative block rounded bg-transparent px-3 py-1.5 text-sm text-surface transition duration-300 hover:bg-neutral-100 focus:bg-neutral-100 focus:text-primary-700 focus:outline-none active:bg-neutral-100 active:text-primary-700 dark:text-white dark:hover:bg-neutral-700 dark:focus:bg-neutral-700 dark:focus:text-primary-500 dark:active:bg-neutral-700 dark:active:text-primary-500"
                                href="#"
                            >Next</a
                            >
                        </li>
                    </ul>
                </nav>
            </form>
        </main>
    );
}


이런 생각 한것과는 다르게 몇몇 부분이 생각과는 다르게 나타났다.


다음에 고쳐봐야지

728x90
728x90

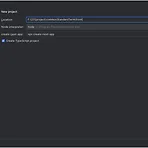
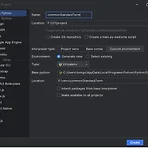
WebStorm NextJs 설정


Front 단에 사용할 Framework는 NextJS입니다. 

이전에 React로 개발해 본 경험이 있고, NextJS에 대해 공부도 해보고자 선택하게 되었습니다.


Code Editor는 VScode 도 있지만 WebStorm을 사용해 보고자 합니다.


WebStrom에서는 새 프로젝트를 만들때 프레임워크를 선택할 수 있고, NextJS도 포함되어 있습니다.


TypeScript를 선택하고 만들어 줍니다.

Create 클릭하면

Terminal에 설정 부분으로 넘어 갑니다.


제가 설정한 값들은 

입니다.


설정값들을 선택 후에는 프로젝트에 필요한 모듈들이 설치됩니다.


설치가 완료되면 프로젝트 기본 파일들이 생성된 것을 볼 수 있습니다.

728x90
728x90

fastapi 엑셀 파일 불러와서 뿌려주기 #4 - 검색


이제 단어 검색을 통해서 검색어에 해당하는 데이터만 보여주는 기능을 추가해봅니다.


문자열 검색의 경우에는 Series.str.contains 와 DataFrame.apply를 사용합니다.

https://pandas.pydata.org/pandas-docs/stable/reference/api/pandas.Series.str.contains.html


pandas.Series.str.contains — pandas 2.2.1 documentation

Fill value for missing values. The default depends on dtype of the array. For object-dtype, numpy.nan is used. For StringDtype, pandas.NA is used.

pandas.pydata.org

https://pandas.pydata.org/docs/reference/api/pandas.DataFrame.apply.html


"""
main.py
@제목: 메인 실행 파일
@설명: 메인 실행 파일

    작성일자        작성자
-----------------------
    2024.03.14    hiio420

"""
import math

from fastapi import FastAPI
from pydantic import BaseModel

from libs import ExcelUtils

# 엑셀 파일 불러오기

file_path = "F:\\[01]project\\commonStandardTerm\\upload\\(붙임)공공데이터 공통표준용어(2022.7월).xlsx"
excel_utils = ExcelUtils()
df_dict = excel_utils.read_excel(file_path)

app = FastAPI()


class Item(BaseModel):
    data_id: int = 0
    page: int = 1
    limit: int = 10


@app.get("/")
def read_root(data_id: int = 0, page: int = 1, limit: int = 10,srch_txt=""):
    if page < 1:
        page = 0
    if limit < 10:
        limit = 10
    df = df_dict[data_id]
    df = df[df.apply(lambda row: row.astype(str).str.contains(srch_txt, case=False).any(), axis=1)]
    first_idx = (page - 1) * limit
    last_idx = first_idx + limit - 1
    total_size = df.shape[0]
    first_page = 1
    last_page = math.ceil(total_size / limit)

    df_sliced = df[first_idx:last_idx + 1].copy()

    df_sliced["번호"] = [i for i in
                       range(total_size - (page - 1) * limit, total_size - (page - 1) * limit - df_sliced.shape[0], -1)]
    data = []
    if df_sliced.shape[0] != 0:
        data = df_sliced.to_dict("records")

    return {"sheetName": excel_utils.sheet_names[data_id], "data_id": data_id, "page": page, "limit": limit,
            "first_page": first_page, "last_page": last_page, "firstIdx": first_idx, "lastIdx": last_idx,
            "totalSize": total_size,
            "data": data}


728x90
728x90

fastapi 엑셀 파일 불러와서 뿌려주기 #2


이전 포스팅에서 파일을 불러와 sheetNames와 data 전체를 응답하는 것을 만들었습니다.

이제 페이징을 할 수 있게끔 page 번호와 표시할 목록 개수를 요청해서 응답 받는 것을 해보겠습니다.


1. Pagination


페이징 처리를 하기위해서 기본적으로 요청 받는 파라미터는 페이지 번호와 출력 갯수입니다.


저는 페이지 번호를 page 출력 갯수를 limit으로 해서 쿼리스트링을 포함시켜 주겠습니다.

@app.get("/")
def read_root(id: int = 0,page:int = 1, limit:int = 10):
    data = df_dict[id].to_dict("records")
    return {"sheetName": xlsx.sheet_names[id], "data": data}

page의 기본값은 1 limit은 10입니다.


두 값을 통해서 DataFrame을 slicing 해야합니다.

그러기 위해서 첫 index값과 마지막 index값을 정해야합니다.


@app.get("/")
def read_root(data_id: int = 0, page: int = 1, limit: int = 10):
    if page < 1:
        page = 0
    if limit < 10:
        limit = 10
    df = df_dict[data_id]
    first_idx = (page - 1) * limit
    last_idx = first_idx + limit - 1
    total_size = df.shape[0]
    first_page = 1
    last_page = math.ceil(total_size / limit)
    df_sliced = df[first_idx:last_idx + 1].copy()

    df_sliced["번호"] = [i for i in range(total_size - (page - 1) * limit, total_size - (page - 1) * limit - df_sliced.shape[0], -1)]
    data = df_sliced.to_dict("records")
    return {"sheetName": xlsx.sheet_names[data_id], "data_id": data_id, "page": page, "limit": limit,
            "first_page": first_page, "last_page": last_page, "firstIdx": first_idx, "lastIdx": last_idx,
            "totalSize": total_size,
            "data": data}


기본값 미만인 값이 들어올경우 기본값으로 바꾸는 조건문을 작성해 줍니다.


첫 index 값은 (page-1) * limit 

마지막 index값은 첫index + limit -1 입니다.

새로운 번호를 매기기 위해서 total size를 구해줍니다.


id 라는 변수는 python에 이미 지정된 함수가 있기때문에 되도록 사용하지 않도록 하기 위해 data_id 라는 값으로 변경했습니다.


response 시에 data,sheetName 이외에도 전달받은 값과 함께 first_page,last_page,first_idx,last_idx,total_size를 추가해 주었습니다.


2. Swagger로 데이터 요청 응답


FastAPI Swagger를 이용한 API 문서를 제공합니다.


3. Pycharm Http request 기능


728x90
728x90

1. 구성 계획


개발환경은 Window에서 진행되고 Backend는 python fastapi Frontend는 nextjs를 사용해볼 계획이다. 배포까지 하면 좋겠지만 추후로 미루기로 하자.

IDE는 Pycharm을 쓸예정이다. (VSCode를 써보 되긴하지만, Jetbrain을 결제해서 쓰고 있어서 Pycharm을 쓰기로 결정 Front도 WebStorm을 쓸 예정이다.


2. 개발환경


OS : Window 10

Python : 3.10

으로 anaconda로 가상환경을 구성하지 않고 venv로 구성을 한다.


1. 프로젝트 만들기


Pycharm 실행 후 New Project를 선택하면 Python관련 프로젝트에 FastAPI가 있지만 Pure Python으로 진행한다.

프로젝트 이름은 commonStandartTerm으로 만들고 Location을 지정해준다.


다음으로 가상환경을 만들어 준다. Python3.10이 설치되어 있지않다면

Base Python에서 아래 화살표를 클릭하면 download and install 할 수 있다.


Location을 적절한 곳으로 잡아주고 Create를 해준다.


프로젝트가 생성되었다.

아직은 아무것도 없다.


먼저 필요한 패키지들을 설치해 보자.


2. 패키지 설치


패키지의 경우 프로젝트를 진행하면서 추가적으로 설치하겠다. 기본적으로 설치할 패키지는 FastAPI, unvicorn,pandas,pytest 이다.


터미널에 pip 로 설치할 수 있지만 requirements.txt 파일을 생성해 Pycharm 기능으로 설치해 보자.


requirements.txt파일을 생성 후 아래와 같이 입력한다.

fastapi==0.110.0
uvicorn[standard]==0.28.0
pandas==2.2.1
pytest==8.1.1


입력 후 저장하면 python에 메세지가 나타나고 설치 할 것인지 물어본다.


install requirements 를 클릭하면 패키지들이 설치된다.


2. Fast API 실행해보기


https://fastapi.tiangolo.com/ko/#_5


FastAPI 사이트에서 제공하는 예제 코드를 main.py에 넣고, 실행해보자.

from typing import Union

from fastapi import FastAPI

app = FastAPI()


@app.get("/")
def read_root():
    return {"Hello": "World"}


@app.get("/items/{item_id}")
def read_item(item_id: int, q: Union[str, None] = None):
    return {"item_id": item_id, "q": q}
uvicorn main:app --reload


port 8000으로 접속하면 Hello World를 볼 수 있다.


#. Pycharm 실행 화경 만들기

터미널에서 

uvicorn main:app --reload

으로 실행할 수도 있지만, IDE를 사용하고 있으니까 실행환경을 수정해서 Pycharm에서 Run 할 수 있게 해보자.


PyCharm 우측 상단에 Run 버튼 옆에 Current File을 클릭하면 드롭 박스가 열리고 Edit Configurations 를 통해 실행 환경을 구성할 수 있다.


+ 버튼을 누르면 실행환경을 구성할 수 있는 목록이 나타나는데 FastAPI를 선택하자


main.py 위치를 정해주고 apply 한다음 Run 해보자.


Error : LookupError: unknown encoding: x-windows-949


실행 시 Encoding 문제가 발생한다면, 프로젝트 세팅에서 encoding을 바꿔준다.


1. settings > Editor > File Encodings > Project Encoding 을 UTF-8


2. settings > Editor > Console > Default Encoding 을 UTF-8


바꾼 후 다시 실행해보면


정상 적으로 실행되고 다시 접속하면

이전과 같은 화면을 볼 수 있다.

728x90
728x90


0. Intro


최근 프로젝트를 진행하면서 단어 정리나 용어 정의를 공공데이터 공통표준용어에 맞춰 하는일이 생겼다.


"공공데이터 공통표준용어"는

행정안전부고시 제2020-42

를 보면

" 공공데이터를 누구나 같은 의미로 이해하고 같은 방식으로 사용할  있도록 공통표준용어를 정의함"이라고 나와있다. 


기존에는 공공데이터 포털에서 제공하는 엑셀 파일에서 필요한 부분을 "찾기"를 통해서 검색해서 사용했는데, 이 데이터를 바탕으로 검색을 좀 더 수월하게 하는 웹페이지를 만들면 어떨까 싶기도 하고 최근에는 JAVA와 Oracle로만 프로그래밍을 하다보니 python과 mariaDB에 대한 기억도 가물가물해지는 감도 있어서 작은 개인 프로젝트로서 진행해 보면 어떨까 싶어 시작하게 되었다.


1. 요구사항


이 프로젝트에 필요한 요구사항은 기본적으로 "검색한 단어를 포함하는 공공데이터 공용표준용어의 데이터를 출력"한다는 것이다.


시나리오는 

1. 검색어를 입력한다.

2. 조회버튼을 클릭한다.

3. 검색어를 포함(또는 전체)를 조회하여 표로 보여준다.

4. 페이징 을 할수 있어야 한다.

와 같이 길지는 않다.


추가적인 기능은 프로젝트를 하면서 붙여나가기로 해보고 개발환경을 먼저 구성해보자.

728x90

+ Recent posts